Ginger Ahi Tuna Tartar


Need:

1-pound sushi grade Ahi tuna, cut into 1/4-inch (or smaller) dice
1/2 cup finely chopped white onion (about 1/8-inch dice)
1/4 cup finely chopped, fresh, peeled ginger (about 1/8-inch dice)
1/4 cup finely chopped chives
Sea salt to taste

1. Combine all of the ingredients and keep chilled until you’re ready to serve.
(레시피 한번 간단하다.)


Caramelized Onion Tart with Gorgonzola and Brie


Caramelized Onion Tart with Gorgonzola and Brie


Need:

2 Tbsp olive oil
4 cups of sliced onions, sliced root-to-top into 1/4-inch thick slices (about 2-3 med onions)
1 Tbsp brown sugar
2 Tbsp balsamic vinegar
1/2 tsp salt
1/2 tsp pepper
8 oz frozen puff pastry (defrosted a couple hours in the fridge)
2 oz chilled Brie cheese, rind removed and diced
2 oz Gorgonzola or other blue cheese, diced
2 Tbsp chopped fresh tarragon


1. Heat oil in a large deep pan on medium-high heat. Add onions and cook for about 10 minutes or until wilted and starting to brown.

2. Add sugar, vinegar, salt and pepper. Reduce heat and cook gently, uncovered for 20-25 minutes or until richly caramelized. Add a little water if the onions look like they are starting to dry out. Cool.

3. Roll pastry into a 10-to-14-inch rectangle (or whatever shape you want). Place pastry on a baking sheet lined with parchment paper. Prick with a fork at a couple inch increments to prevent the pastry from forming big bubbles while baking. (난 아마도 난을 사서 사용할 듯...)

4. Spread onions over pastry, all the way to the edges of the pastry. Dot with cheese. Sprinkle with tarragon. Refrigerate if not baking immediately.

5. Bake in a preheated oven at 400°F for 18-20 minutes or until cheese has melted and pastry is crispy. Cool for 5 minutes.


오늘은 고르곤졸라 치즈를 골라봤다. 양파타르트를 시도해 볼만 하다.

(Sources: cookingontheweekends, simplyrecipes)

'recipes' 카테고리의 다른 글

[recipe] Pad Thai  (0) 2012.01.26
[recipe] 블랙빈 퀘사디아  (0) 2012.01.15
[recipe] 코코 오븐 넛츠  (2) 2011.12.29
recipe: refried beans  (4) 2011.11.28
[recipe] 치아바타 빵  (0) 2011.11.10

제법 간단하면서도 추가재료를 구입하지 않아도 될 것 같은 간식 레시피:


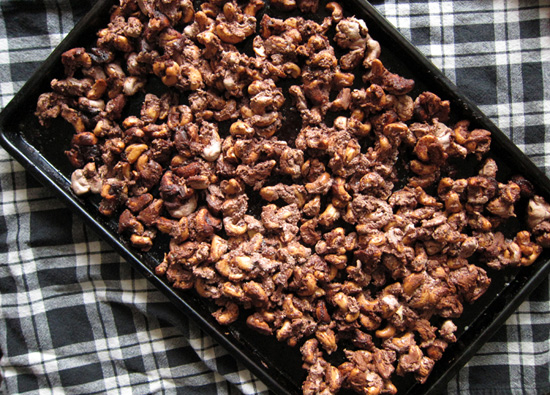
Salted Cocoa Roasted Nuts


3 1/2 c roasted nuts
5 tablespoons butter, cut into chunks
2 large egg whites
1 cup sugar
1 heaping tablespoon cocoa
1 teaspoon kosher salt

1. Preheat oven to 350F and place your oven rack in the middle of the oven.

2. Put chunks of butter into a rimmed baking sheet and place in the oven until melted, about 1 - 2 minutes, tops!

3. Remove from oven, swirl the butter so that it covers the entire pan, and set aside.

4. Beat your egg whites in your stand mixer (or by hand) until the whites just begin to hold their shape. Gradually add in the sugar and whisk until sticky and shiny - about 2 more minutes. Fold in cocoa along with the nuts.

5. Spoon the nuts evenly over the melted buttered baking sheet and bake for 8-10 minutes.

6. Remove from oven and quickly give it another stir. Return again for another 8-10 minutes.

7. Remove, stir again and sprinkle with salt. Bake for a final 8-10 minutes.

8. Finally, remove from oven for good this time and stir up the nuts so they break apart. Let them cool completely and then store in an airtight container for about a week (yeah, right).


(Source: poppytalk)

올해 초에 텍사스로 처음 놀러왔을 때 매일같이 먹던 멕시칸식 음식, 특히 black beans 또는 refried beans 는 소화도 참 잘 된다는 것을 배웠다.


Bean basics for both dried pinto beans and black beans:

How to store beans
Keep dried beans in an airtight container in a cool, dry, dark place for up to 1 year. The older the beans, the longer they take to cook.

How to soak beans
The easiest way to soak beans is to cover 1 pound of beans with 8 cups cold water in a big pot or Dutch oven and let them sit overnight. For same-day results, combine the beans and water in the pot and bring to boiling. Reduce heat and simmer for 2 minutes. Remove from the heat and let stand, covered, for 1 hour. Drain and rinse the beans well.

Tip: Add a pinch of salt to the soaking water to make the beans softer. Make sure to rinse the beans well since salt will toughen the beans as they cook.

How to cook dried beans
Cook the beans according to your recipe. Or place the soaked and rinsed beans back in the pot and cover with 8 cups fresh water. Bring to boiling; reduce heat. Simmer, covered, for 75 to 90 minutes or until tender, stirring occasionally.

Tips: To speed up cooking, add ½ teaspoon baking soda to the cooking water.

For the best flavor and texture, cook beans the day before they are served and allow them to cool in their cooking liquid. This allows more time for the flavor to develop and for the beans to soak up some of the liquid. Though it's ideal to soak the beans until the water is cool, you don't have to cool completely before draining.

Using canned beans: It's quick and convenient to cook with canned beans. Rinse and drain the beans before cooking since the liquid in canned beans is typically high in sodium.


How to make refried beans

Refried beans are not actually fried -- they're cooked twice, a process that gives them their flavor. Use refried beans as a side dish, as a dip for tortilla chips, or as a filling for tostadas, burritos, and enchiladas. You can use homemade and canned refried beans interchangeably.

1. Soak and drain ½ pound pinto beans as directed above.
2. Cook the beans (following directions above) for 2-½ to 3 hours or until the beans are very tender.
3. Drain the beans, reserving the cooking liquid.
4. In a saucepan cook garlic in olive oil.
5. Add the beans and mash them with a potato masher.
6. Stir in just enough of the reserved cooking liquid to make the beans smooth and pastelike.
7. Continue to cook until thick, stirring often to avoid sticking and scorching.
8. If desired, top refried beans with shredded cheese, snipped cilantro, or chopped green onion.


집에 만들어 놓으면, 사 먹는 딥 대신에 칩과 함께 먹으면 좋겠다.


(Photo:
bhg)

어제 저녁부터 아래 링크의 치아바타 빵 베이킹을 시도하고 있다.


Need:


4 cups (510 grams) white whole wheat flour
1-1/4 teaspoons (4 grams) instant yeast

1-1/4 teaspoons (10 grams) salt
1-1/2 teaspoons (10 grams) honey or sugar
2 cups + 2 tablespoons (482 grams) room temperature water, about 70ºF
1-1/2 tablespoons (21 grams) extra-virgin olive oil


만드는 절차는 사이트를 한 5-6번은 읽어야 한다. (적어도 난 한 스텝을 10번 정도 읽었음. 읽다 보니 pizza stone 은 뭐고 oven-safe rocks 는 뭔지... 뭐든 시도하기 전에 레시피를 끝까지 한번 훑어 보고 만들어 봐야겠군. -_-.)  


어쨌든, I'm so excited for the bread that's baking right now!


(Source: themusicianwhocooks)

다음을 기약하며 우선은 보관하고 싶은 쿠키 레시피와 조만간 시도해 볼 고구마 hummus 레시피:


Cornflake Chocolate Chip Marshmallow Cookies


momofuku milk bar cornflake cookies!


Need:

16 T. (2 sticks) room-temperature butter
1¼ C. granulated sugar
2/3 C. light brown sugar, tightly packed
1 egg
½ t. vanilla extract
1½ C. flour
½ t. baking powder
½ t. baking soda
1½ t. kosher salt
3 C. Cornflake Crunch
2/3 C. mini chocolate chips
1¼ C. mini marshmallows


1. In the bowl of a stand mixer fitted with the paddle attachment, combine butter and sugars; cream together on medium-high 2-3 minutes. With a spatula, scrape down sides of bowl, then add egg and vanilla and beat 7-8 minutes.

2. Reduce speed to low; add flour, baking powder and soda, and salt. Mix just until dough comes together, no longer than 1 minute. (Do not walk away from the machine during this step or risk overmixing.) Scrape down sides of bowl.

3. Still on low speed, paddle in cornflakes and chips until just incorporated, about 30-45 seconds. Paddle in marshmallows.

4. Line a sheet pan with parchment paper. Using a 2-oz. ice cream scoop, portion 1/3 c. dough at a time onto pan. Pat tops of dough domes flat. Wrap pan tightly in plastic wrap and refrigerate for at least 1 hour or up to 1 week. (Do not bake room-temperature disks — they will not hold their shape.)

5. Heat oven to 375°. On a parchment- or Silpat-lined sheet pan, arrange chilled disks a minimum of 4 inches apart. Bake 18 minutes, until cookies are browned on edges and just beginning to brown toward the center. Cookies will puff, crackle, and spread. Leave them in oven for another minute or so if they still seem pale and doughy on the surface.

6. Cool cookies completely on pan before moving them to a plate or an airtight container for storage. At room temperature, cookies will keep fresh for 5 days; in the freezer, they will keep for 1 month.


Spicy Sweet Potato Hummus


sweet-potato-hummus-recipe2


Need:

2 medium sweet potatoes
3 T olive oil
2 C chickpeas
3 T tahini
3 cloves garlic, peeled
juice of 1 lemon
zest of 1/2 lemon
ground sea salt, to taste
1 1/2 t cayenne pepper
1/2 t smoked paprika
1/4 t cumin


  1. Preheat oven to 400 degrees Fahrenheit. Bake the sweet potatoes on the middle oven rack or in a baking dish for 45 minutes to an hour. They should yield to a gentle squeeze when they’re done baking.
  2. While the sweet potatoes are cooling, toss all of the other ingredients into a food processor. Once the sweet potatoes have cooled enough to handle, use a knife or your fingers to peel the skin off of them. Add the sweet potatoes to the food processor.
  3. Blend well, and serve! I garnished mine with a light sprinkle of cayenne pepper and sesame seeds.


    (Source: dailycandy, onegreenplanet)

'recipes' 카테고리의 다른 글

recipe: refried beans  (4) 2011.11.28
[recipe] 치아바타 빵  (0) 2011.11.10
[recipe] 딸기 바질 아이스크림  (0) 2011.10.25
[recipe] Milk Chocolate Chip Cookie  (2) 2011.10.22
레시피: Sourdough bread  (0) 2011.10.12

예전부터 결혼해서 나만의 살림이 있다면 꼭 요거트/아이스크림 메이커를 마련하겠다고 마음 먹었었으나, 현재 전기밥솥도 없는 마당에 아이스크림 메이커는 조금 오버인 것 같다.

하지만 이 레시피는 아이스크림 메이커가 없는 가정을 위한 instructions 도 친절하게 포함되어 있다: "whip it with a spoon till your arms are sore." (돈이 없으면 몸이 피곤한 게로구나.)


Need:

450 ml heavy cream/double cream//heavy whipping cream
250 ml half and half
1 lb fresh strawberries + 1/2 lb fresh strawberries, washed, and hulled
2 cups loosely packed fresh basil leaves (no stem)
1.5 cups sugar, or as per taste
a pinch of salt
zest of 2 medium sized lime
1/2 cup blanched and slivered almonds, very lightly toasted
1 tablespoon vodka (optional – the alcohol helps break up the crystals)

(Note: Instead of using part half and half, and part heavy/double cream, you can use all heavy/double cream)


1. Blend/process half and half, heavy cream (or cream if you are using all cream), sugar, zest, 1 lb strawberries, basil leaves until smooth.

2. Chop the 1/2 lb strawberries. Set aside. This is going to be added to the ice cream for some extra bites.

3. Crush nuts just enough and not too much, or they will release oil. Set aside.

4. Combine all ingredients, with the cream, basil and strawberry blend in the ice cream maker and process as per instructions. Add the vodka and churn for another 10 minutes.


If you do not have an ice cream maker:

1. In a large container, stir in the basil & strawberry cream blend, almond, zest, salt, chopped strawberries and the vodka and freeze.
2. Approx. every one to two hours take the ice cream out from the freezer and blend it with the hand blender or whip it with a spoon till your arms are sore – this is to break up the ice crystals.
3. You might have to repeat this process about 3 – 4 times.)
4.
Freeze until all set.


(Source:
ecurry)


MILK CHOCOLATE CHUNK COOKIES with PINK SEA SALT
(makes about 3 dozen)

Ingredients:

3 1/4 cups of all purpose flour
3/4 teaspoons of salt
1 cup of unsalted butter, room temperature
2 cups of Golden Yellow or Brown sugar
2 large eggs, room temperature
2 teaspoons of pure vanilla extract
2 1/2 cups of Lindt Piccoli Extra Milk chocolate, chopped into chunks (or any high quality milk couverture chocolate!)
Teensy bit of pink sea salt for each cookie.

Make Them!

1. Preheat oven to 350 degrees. Line baking sheets with parchment paper.
2. In a medium bowl, sift flour and salt to combine.
3. Using a stand mixer, mixmaster or hand-held beaters, cream (or beat) butter and sugar on medium speed for 4-5 minutes until fluffy, scraping down sides of bowl.
4. Add eggs, beating on low to combine.
5. Add pure vanilla extract to combine.
6. With mixer on low speed, slowly add flour mixture until just combined.
7. Fold in milk chocolate until well integrated!
8. Using a small ice cream scoop, scoop balls of dough onto lined baking pans, 1 dozen per sheet.
9. Sprinkle a teensy amount of pink sea salt crystals on each cookie before baking - don't oversalt. Probably 7 crystals is enough!

Bake cookies for 11-14 minutes (some ovens are hotter than others), turning pans halfway through for even browning, or until cookies are lightly browned on edges and your kitchen smells like delicious cookies! Let cool on pans. Enjoy with a glass of almond milk, or plunk on top of a dish of vanilla ice cream!


베이킹 레시피들을 보다 보면 항상 재료 하나가 모자라서 포기하곤 하는데, 여기 재료들은 다 이미 집에 있는 것들.
유통기한이 있는 베이킹소다도 지난 번 오트밀쿠키 때 개봉 후 하루 빨리 사용해야 하는데 벌써 냉장고 냄새 없애는데에만 3T 씀.
베이킹 소질을 키우고 싶다.


(Source: poppytalk)
Sourdough 의 신맛이 강할 수록 맛있다. 샌프란시스코, 시애틀 등의 farmers market 에서 구입해 먹는 것들은 참 맛있었는데, 역시 마트에서 포장되어 나오는 사워도우는 별로...


그래서 언젠가 이 레시피를 시도해 볼 생각이다:


Need:

2 C bread flour
3/2 C sourdough starter, recipe follows*
3/4 t salt

1. In an electric mixer with the dough hook, combine the flour, starter* and salt, and knead until it no longer sticks to the sides or bottom of the mixing bowl.

2. Place a lightly oiled bowl, turning to coat. Cover with plastic wrap and let dough rise in a warm, draft-free place until doubled in size, 1 to 1 1/2 hours.

3. Turn out onto a lightly floured surface. Sprinkle lightly with flour and knead gently, removing any large air bubbles.

4. Knead into a small circle, then shape into a tight ball, pinching the seams together underneath.

5. Place on a well-floured board or baking peel, seam-side down. Cover with a kitchen towels and let rest until doubled in size, about 1 hour.

6. Preheat a baking stone, if available, on the bottom rack of an oven at 400 degrees F.

7. With a sharp, serrated knife, cut a large "X" or cross-hatch pattern into the top of the dough.

8. Spray lightly with a mister and transfer to the baking stone (or place on a heavy baking sheet lightly dusted with cornmeal) and bake until golden brown and the bread sounds hollow when thumped on the bottom, about 60 minutes. (Sourdough should have a darker crust than other breads, so leave in the oven 5 minutes after you think it is done.)

9. Remove the loaf from the oven and let cool on a wire rack for at least 30 minutes before serving.

* Basic Sourdough Starter

Need:

3 C warm water (110 degrees F)
3/2 T active dry yeast
1 t sugar
3 C all-purpose flour

1. In a large bowl, combine the water, yeast, and sugar. Let sit until the yeast becomes foamy, about 5 minutes. (If the yeast does not foam, discard the mixture and begin again with a new yeast.)

2. Add the flour and stir vigorously to work air into the mixture. Cover with a towel let rest in a warm, draft-free place (an oven with its pilot light or light bulb turned on works well) for 8 to12 hours. (The mixture should become very bubbly.) Use immediately or cover loosely with plastic wrap and store in the refrigerator.

3. Preserving the Starter: Each time you remove a portion of the starter for a recipe, reserve at least 1/4 cup and replace the amount you have taken out with equal amounts of flour and water.

For example, if you remove 1 cup of starter, you must replace it with 1 cup of flour and 1 cup of warm water. Whisk these ingredients into the starter until blended but not completely smooth, cover loosely, and return to the refrigerator.

4. Also, the starter must be maintained by feeding it every few days. Refresh by removing 1 cup of the starter (give to a friend or discard it) and adding 1 cup of flour and 1 cup of warm water. Whisk until blended but not smooth. Cover loosely and return to the refrigerator.

If you plan to be away longer than a week, freeze the starter in a sterilized, airtight freezer container. Thaw the starter 2 days before you plan to bake with it. Refresh as indicated above with 1 cup each of flour and warm water. Cover and leave at room temperature 12 hours or overnight before using.

CAUTION: Never keep your starter tightly closed! The gasses expelled by the yeast will build up pressure and may cause the container (such as a glass jar) to burst!

Yield: 5 to 6 cups Prep time: 10 minutes Inactive prep time: 12 hours


하지만 언제가 될런지는 불확실...
단단한 마음의 준비를 해야 할 듯.


(Source:
foodnetwork)

좀 시간이 걸리지만 한번 해 먹고픈 스프. Some day...


Need:
3 pounds plum tomatoes, halved lengthwise
2 t olive oil
2 large or 4 small cloves garlic, unpeeled
1 t finely chopped fresh thyme leaves or 1/4 teaspoon dried
1/4 t (or more to taste) dried crushed red pepper
4 C chicken or vegetable stock

4 1-inch slices from a large loaf of rye bread, whole wheat sourdough or bread of your choice (or 16 1-inch slices from a baguette), toasted until hard and lightly buttered on one side
1 T grated raw onion
1 C coarsely grated cheddar (or more to taste)

1. Preheat oven to 400°F.
2. Wrap garlic cloves in a tight foil packet.
3. Place tomatoes, cut side up, on large baking sheet. Sprinkle generously with salt and pepper (I used 1 full teaspoon of Kosher salt).
4. Drizzle tomatoes with olive oil.
5. Add foil packet of garlic to tray.
6. Roast until tomatoes are brown and tender (garlic will be very tender), about 1 hour. Cool slightly.
7. Unwrap garlic packet and peel cloves.
8. Transfer cloves, tomatoes and any accumulated juices to a blender or food processor and pulse machine on and off until tomatoes are a chunky puree.
9. Transfer tomatoes to medium pot and add thyme, crushed red pepper and stock and bring to a boil. Reduce heat to a simmer and cook, uncovered, for 25 minutes. Remove from heat and adjust seasonings to taste.

10. Preheat oven to 350.
11. Arrange four ovenproof soup bowls, crocks or large mugs on a large, foil-lined baking sheet.
12. Stir grated onion into the warm soup.
13. Float toast slice(s) in each bowl, buttered side up and divide grated cheese generously over top.
14. Bake soups on tray for 15 to 20 minutes, until cheese on top is bubbling and brown at the edges.


(Source: smittenkitchen)

어제 오늘 유난히 배가 고프다.
먹어도 먹어도 배가 고프다.


Perfect Pan-Roasted Chicken Thighs

Need:
1T vegetable oil
4 skin-on, bone-in chicken thighs
salt & pepper

1. Preheat oven to 475F.
2. Season both sides of the chicken with salt and pepper.
3. Heat oil in a heavy cast iron skillet over high heat. Add chicken skin side down and cook for 2 minutes.
4. Reduce heat to medium-high and cook for 12 more minutes skin side down, rotating and rearranging chicken to evenly distribute heat until the fat renders and skin is golden brown.
5. Move skillet to the oven and cook for 13 more minutes, still skin-side down. Turn over chicken and cook for another 3-5 minutes.
6. Remove from oven and transfer to a plate and let it rest for 5 minutes before serving.


Spicy Lemon Green Beans, Kale, Zucchini

Need:
2T olive oil
3 garlic cloves, sliced
1lb green beans, cut into thirds
3 green onions, cut into 1 inch pieces
1 bunch kale, cut into thin ribbons
1/4c white wine
1/2t salt
1/4t aleppo pepper or crushed red pepper
1 small zucchini, cut into batons
1/2 lemon
3T grated parmesan cheese

1. Heat the olive oil in a large skillet over med-high heat.
2. Add in the garlic, green beans and kale, and toss until bright green – about 4 minutes.
3. Add in the wine along with the salt and pepper and give everything a good toss.
4. Add in the zucchini and turn down the heat slightly and cook for 2 more minutes.
5. Squeeze the lemon over the vegetables and sprinkle the parmesan over top.


(Source: everybodylikessandwiches, everybodylikessandwiches)

'recipes' 카테고리의 다른 글

레시피: Sourdough bread  (0) 2011.10.12
체다치즈 얹은 토마토스프  (3) 2011.09.26
Salsa Verde, 와사비 살사와 호박 피클.  (2) 2011.09.14
멕시칸 초콜렛 아이스크림  (0) 2011.08.06
상그리아  (2) 2011.05.08

+ Recent posts